Sunday, December 4, 2016

Does Tally ERP Users need to worry about Ransomware ?

Tally ERP 9 Data and Ransomware


Do we (Tally Users) really need to 
worry about Ransomware ?

What are the ways we could effectively avoid
Ransomware threats on our Tally Data ?

Come lets find it and dig deeper into it.

A Few Days Back, 
A company owner called me up.

He said, My entire Tally Data 
has been encrypted 
because of ransomware attack.

And now attacker is asking 
for a ransom money in Dollors. 
Can you help me ?

The first question 
I asked was, 
do you have a backup ?

He looked down and said "No".

Well, that was the huge mistake and he will surely take care about it from now on. But we are still on way ahead to know how this ransomware attack actually happens ?

Ransomware can be injected into our PC through various methods.
  1. Maybe you have opened an email from unknown source and have checked into an attachment which got executed in your system and now the ransomware is sitting in your PC.
  2. May be you have downloaded an application from unknown source and installed an application with which ransomware has also made home in your PC. 
  3. May be you have copied an application from some other PC with which ransomware has been injected.
So there are different possibilities. But the question here arise about what this ransomware would have done in your PC. Lets find it out to so that we can further plan on how it could be avoided or neutralised.

How Ransomware operates in your PC ? 
If our PC is already affected by a Ransomware, believe me, it is very difficult to neutralise ransomware in your system. For many viruses your antivirus has capability to remove it. But Ransomware is unfortunately not easily dealt with antivirus utilities and tools.

As we discussed, Ransomware reaches your system through means and medium where it gets a chance to execute in your system. This execution is done in a normal way as other Windows based application and scripts. It is not actually done automatically but it happens because an unaware user executes the script or application that actually sets up ransomware in your PC.

So in general if Ransomware script or application get a proper Windows environment then it will run, execute it self to reach the weakest part of the system and get affected for doing stuffs that it was designed for.

Ransomware can be easily avoided :
Lets see how Ransomware can be easily avoided. The most basic remedy can be to Not Provide a platform where ransomware can run, execute and get affected to reach the most critical part of your system. Is this possible ?

Yes it is, and that too without changing habits of users who download and execute email attachments and application received from unknown source.

Yes, without changing habits of users and without exposing vulnerabilities that our systems have due to improper protection on our PCs.

How is it possible ?
The Most basic requirement for any Ransomware script or utility is to have a Proper MS Windows environment to execute itself. Right ? Now imagine if you are not at all providing any sort of Windows environment for ransomware to execute.

How is it possible to not provide a Windows environment in a PC where we want to run Tally, Internet and other Office applications ?
It is possible, and it is possible with Tiguin Linux OS.

Tiguin Linux OS 
can run Tally ERP on it.

Tiguin Linux OS 
creates a separate space 
for Tally ERP to run.

This separate space 
is not at all linked with 
the actual System area.

If at all viruses and ransomware enter into the system, 
it won't at all be able to reach your Tally or Tally Data.

You never need to worry about any Virus or ransomware affecting your Tally when you are using your Tally on Tiguin Linux.
How, What is so special about Tiguin Linux OS ?
Ok lets look at it with an example.
  • Mr X is using Tally ERP on Tiguin Linux.
  • Mr. X has an email to access, so he will definitely download attachments received by email from unknown sources.
  • But the attachment won't get executed since it is a Linux environment where the attachment is trying to get executed.
  • it will never be able to find Tally Data.
  • and finally it won't be able to affect your Tally Data. Its as simple as that.
Proper way of safely using Tally ERP 9 could be proposed as follows :
  • Run your Tally ERP 9 on a Tiguin Linux System.
  • Setup all your Tally ERP Data on the same Tiguin Linux system.
  • Now you can run your Tally ERP 9 using RDP (Remote Desktop Protocol) on any Windows, Linux or Mac based Systems.
You need not buy any RDP License for doing this, so don't worry, just having Tiguin Linux will enable you to run Tally ERP9 in your network without any threats of Ransomware.

Thursday, November 28, 2013

Tiguin Linux a dream come true.

After receiving immense love, appreciation, encouragement & support from users of Tornado ThinClient OS across India, "The Team" is highly enthusiastic towards offering gratitude at the launch of Tiguin Linux OS.

While the team mates are busy in development promotion and lot more, on the other hand people in Mumbai, the econimic capital of India are showing deep interest for holding the launch of Tiguin Linux to mark yet another moment in history of Linux computing in India.

Analysis of the forms received for launch of Tiguin and request for Tiguin DVDs magnifies the idea of Linux computing to a more clear picture.

It will be a real show for development & support team to heartily satisfy every question raised in any mind.

Looking forward to the highest satisfaction of all Tiguin Linux users.

Monday, September 30, 2013

2X Client on Thin Clients - Save Software Licensing Cost


Many organisations configure 2X server on Windows Server to manage applications with 2X and allow their users to use applications using 2X Client. On the other hand their users use 2X Clients on their client machine to connect to the server and use applications made available by 2X server. In this scenario both the Server and Client are Windows based systems.


Such Organisations can reduce their client Software Licensing Cost by using Linux Thin Clients and avoid Fat Client OS Licensing Cost. 2X Client can be easily run in a 1GB Thin Client OS that people know as Tornado Thin Client OS.


Tornado Development team offers simple patches for their Thin Client users to use 2X Client in thin client as easily as how they do in Windows based Fat Clients. Functionality of 2X Client in Tornado OS is pretty similar to that of 2X Client in Windows Fat Client. (watch this VIDEO)


Tornado OS and Addon for 2X Client is available for Download at http://www.tornado-os.com

Saturday, September 28, 2013

Tornado, smallest thin client OS for almost any hardware

 Almost every Thin Client OS is customized for a particular Hardware. It can run on a specific Motherboard / CPU set, there has to be a specific Display Adapter and so on.

Tornado offers a totally brand new experience with fantastic hardware support for thin client. The 1 GB foot print of OS supports almost any type of Motherboard, CPU, Graphics Adapter.

This Small but powerful OS offers support for different embedded applications in thin client. Applications like SAP-Client, 2X-Client, Citrix-Client, VPN-Client, Office Applications, Web-Browser and many more are easily made available in this small size OS.

Moreover, inbuilt & plug-n-play support for several printers from HP, Canon, Epson, Samsung, Brother, Wipro, and many more avoids users to every now and then do big processes for installing printers in thin clients.

Grab your copy of Tornado from http://tornado-os.com/download.php
For More Information visit http://www.tornado-os.com

Friday, May 24, 2013

ffmpeg unmet dependencies error in ubuntu 12.04

While I was trying to install ffmpeg

apt-get says it is already installed

but I was not able to fire ffmpeg as command

so I tried to remove it and then install it again

it said unmet dependencies

then I added 2 repositories to my sources.list file

nano /etc/apt/sources.list.d/ffmpeg.list
deb http://www.deb-multimedia.org wheezy main non-free
deb http://ftp.de.debian.org/debian sid main

then I installed 3 packages
apt-get install libopus0
apt-get install libavcodec54
apt-get install ffmpeg

and finally I got my ffmpeg command available.


Friday, February 18, 2011

Tally on Linux - The dream comes true

We have missed out 26th of January 2011 to make this announcement which we are really upset about since this article is all about freedom of software usability. But today is also not a bad day "Indians are breaking the world cup shell".

We have respect for Tally which has been serving as one of the best Accounting Software in Indian Market especially in SMEs people have blind faith and belief in Tally. Tally pricing i.e. Single user for Rs. 13,500 and Unlimited Multi-user for 40,500 is perfectly pricing for Indian market. There is no question about it. But the question here is why should we pay extra 20-22 thousand rupees, on OS and basic applications, per machine to just use Tally.

Just for using Tally we purchase a License of Microsoft Windows (Rs. 8000), Ms. Office (Rs. 12,000) and Antivirus (Rs. 1,000) per desktop pc (price is approximate). Why cant we get something like tally for Linux.

All other alternatives like Text Editors, Office Applications, Multimedia Applications, Internet Applications are easily available with Linux. It is just because of Tally that many single users and multiusers have to purchase Proprietary software and invest huge amount on software licensing (or join software piracy in that matter).

Since last 1.5 to 2 years we have been getting lot of enquiries from people who want to port Tally in any way on the Linux. People have tried Wine to port tally on Linux but Tally with wine doesn't perform in a way that it can be used for serious work in enterprise environment. Tally on Linux ? have always been a question.

Slowly and steadily we are able to gather a group of people, who now believe in open-source terminology and technology and who are interested in developing an open-source alternative of Tally. Our planning till now will definitely lead us in creating an open-source Alternative which will exactly work like Tally.

Next big question is migrating old tally data to new open-source alternative. This will be taken care of by a team of 17 tdl programmers willing to work on open-source technology and provide people with a badly needed accounting software that can easily run on Tally with previous data intact.

Since the project is open-source we cannot promise for a date or month of release. But most probably by March 2012 we would be coming up with the first beta release which will be made available to people through Free website downloads. Soon our dream of Tally on Linux will rise over the horizons of Computing World.

This project will also be a source of study for people willing to work on open-source. Technology we invite more and more people for the same.

Sunday, February 13, 2011

Set screen resolution from grub in Linux

We know that in Linux VGA Properties are handled by xorg.

But if we need to control the VGA resolution before the control goes over to xorg
it can be easily done from the Grub

There are different Grub VGA Modes that can be enabled from the kernel boot up line in Grub

This property can be set with vga=xxx where xxx is the value that denotes different colour depth and screen resolution.

This property is used by editing the kernel boot-up line in Grub
Edit the kernel boot up line when grub screen arrives at the startup

and at the end of the kernel boot up line just add vga=xxx. different values that can replace xxx for different purposes are listed below.

Colour depth 640x480 800x600 1024x768 1280x1024 1400x1050 1600x1200
8 (256) 769 771 773 775
15 (32K) 784 787 790 793
16 (65K) 785 788 791 794 834 884
24 (16M) 786 789 792 795

Tuesday, January 11, 2011

Linux users Resume Firefox Failed Downloads

Many a times we are downloading big size files through default download manager available in firefox. Some times due to some or other problems the download fails (mostly because of internet connection dropped). For Eg. if your are downloading from http://exampleurl.com/file.iso and suddenly internet connection dropped the download failed and we are not able to resume.

Wget comes to rescue :

wget is a commandline download manager available in Linux which can be efficiently used to continue with the downloads and successfully complete it

Step 1 :
Rename the failed download file and remove the .part extension.
Eg. Rename the file from file.iso.part to file.iso


Step 2 :
Then from the commandline move to the location where the failed downloaded file is


Step 3 :
is wget command with -c option


Example :
cd /path/to/the/failed/download/file/
wget -c http://exampleurl.com/file.iso

Enjoy and do comment on this
till then awaiting a new blog article to come

Mail Merge in Openoffice.org 3.0

Mail Merge in Openoffice.org 3.0 Writer

Scenario :
There is a spreadsheet which contains data which we want to use for mailmerge on OO Writer

Example File names :
Data file : datafile.ods (You should have this file ready when following instructions given below)
Main Template : draft.odt (This file will be created during the procedure)
Database Connection : database.odb (This file will be created during the procedure)
Finally save file or print to printer (This file will be created during the procedure)

Step 1 :
Installing Base (if not installed by default)

You need to have openoffice.org Base installed first in case of Ubuntu Linux it is not installed by default
Go to Synaptics --> Quick Search --> openoffice.org
Double click to mark for installation (if not installed)


Step 2 :
Adding Data Source
Create a new Document in Writer (Word Processor)

Go to File Menu --> Wizard --> Add Data Source

Select External Data Source --> Click Next

Select Settings
Database Type = Spreadsheet --> Click Next

Browe for your Spreadsheet file --> Click Next
I have browsed for datafile.ods

Select the correct sheet --> Click Next

Now give the name for Database file --> Click finish
I have created database.odb

Note :
This database file is a link between your original spreadsheet database and mailmerge document. So we need not do this every time for same database. which means next time if you want to create a different mail merge document based on same database you can use the currently created database file


Step 3 :
Adding Mail Merge Fields

Press Ctrl+F2 (or go to insert menu --> fields --> others)

in left pane select mail merge fields

in right pane double click on your database name (in my case database)

Then double click on sheet and finally double click on field you would need

repeat same procedure for adding other fields also


Step 4
Finalising
After you have completed inserting fields

Go to File menu --> Print --> Click on Yes when asked for printing form letter

A Dialog box with complete database details will appear

Very carefully go through different sections of dialog box

Upper Part is where you can see all database records and also select records you want to add to merge

Below on left side is where you can select no. of records or selected records

on right side is where you can select to send the output
  • directly to printer
  • or to a file
if you select file
on the next screen it will ask for saving the file

Important Note :
Some time we have to print different records on same page
Example : When we are printing Lables from mail merge database

Every thing above will be same for first Label
but when you go to next Label

Press Ctrl + F2
in the left pane select Next Record
And then select Insert button at the bottom
and finally close the dialog box

Once you have created a label with next record field you can copy the same to rest of the labels

and finally
file menu --> Print
rest is same as above

I will soon come up with next
till then
Do comment on this post
Enjoy......

Wednesday, December 16, 2009

Google Gujarati Support

Storing transliteration bookmarklet on Firefox

Note: Transliteration bookmarklet is supported on Firefox version 3 and above. If you come across font issues, see this Wikipedia article for possible solutions.

Perform the following steps:
  1. Right-click this link: [અ Type in Gujarati].

  2. Click on "Bookmark This Link".

    Adding bookmarklet to Firefox toolbar

  3. Choose "Bookmarks Toolbar" in the "Folder" option.

    Choosing Bookmarks toolbar in Firefox

  4. Click "Done".

After following the above steps, a bookmark with name [અ Type in Gujarati] should appear in the Firefox Bookmark toolbar as follows:

Firefox Bookmarks toolbar


If you do not see the the bookmark, follow this additional step:

Make sure that the Bookmarks toolbar is enabled. Right-click on the empty space next to "Help" menu and click on the "Bookmarks Toolbar" option:

Ensuring Bookmarks toolbar is visible in Firefox


Done! You can now go to Using the transliteration bookmarklet section for details on how to use the bookmarklet.

Friday, November 13, 2009

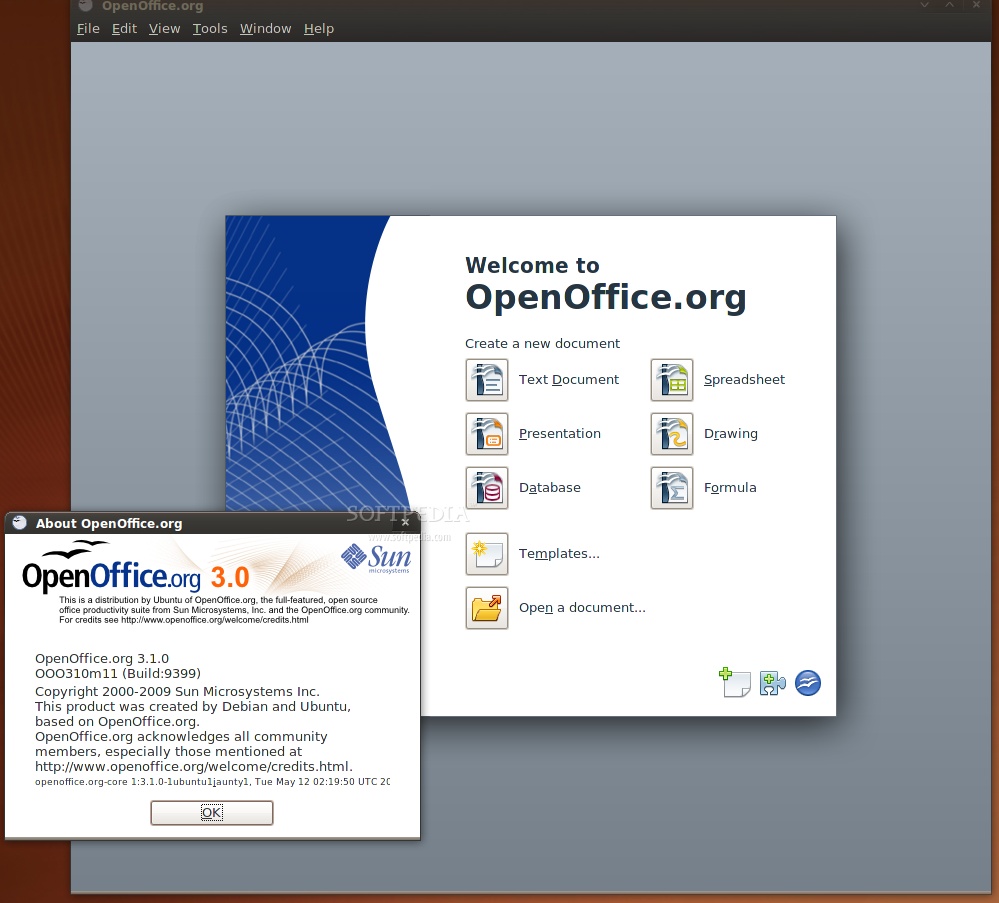
Install Openoffice 3.1 in Ubuntu 8.10

Hi friends,
lets straightaway get started with the steps involved in installing the newly arrived openoffice 3.1 in Ubuntu 8.04 / 8.10 / 9.04 / 9.10

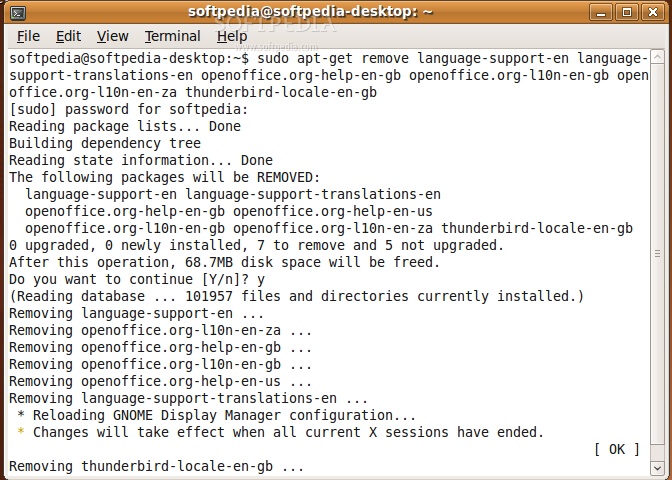
First Step : is to remove the existing openoffice if you have it.

Remove your existing OpenOffice installation by using the following two commands:

sudo apt-get remove --purge openoffice.org
sudo apt-get autoremove --purge


Add the OpenOffice.org 3.1 repositories

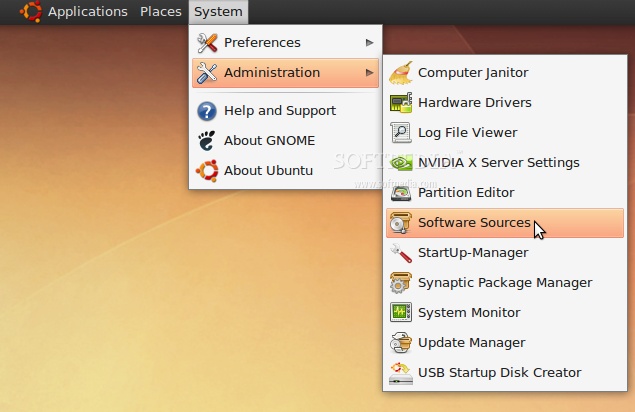
Go to System -> Administration -> Software Sources...

Review image


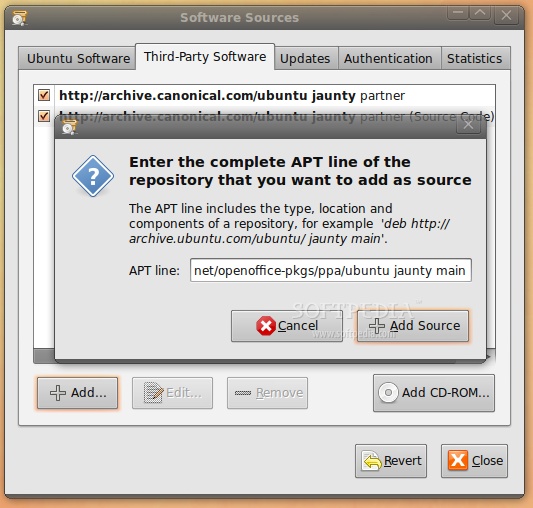
Enter your password. Go to the second tab, "Third-Party Software," click on the "Add" button, and paste the line below for your Ubuntu distribution...

For Ubuntu 8.04

deb http://ppa.launchpad.net/openoffice-pkgs/ppa/ubuntu hardy main

For Ubuntu 8.10

deb http://ppa.launchpad.net/openoffice-pkgs/ppa/ubuntu intrepid main

For Ubuntu 9.04

deb http://ppa.launchpad.net/openoffice-pkgs/ppa/ubuntu jaunty main

For Ubuntu 9.10

deb http://ppa.launchpad.net/openoffice-pkgs/ppa/ubuntu karmic koala main

Review image


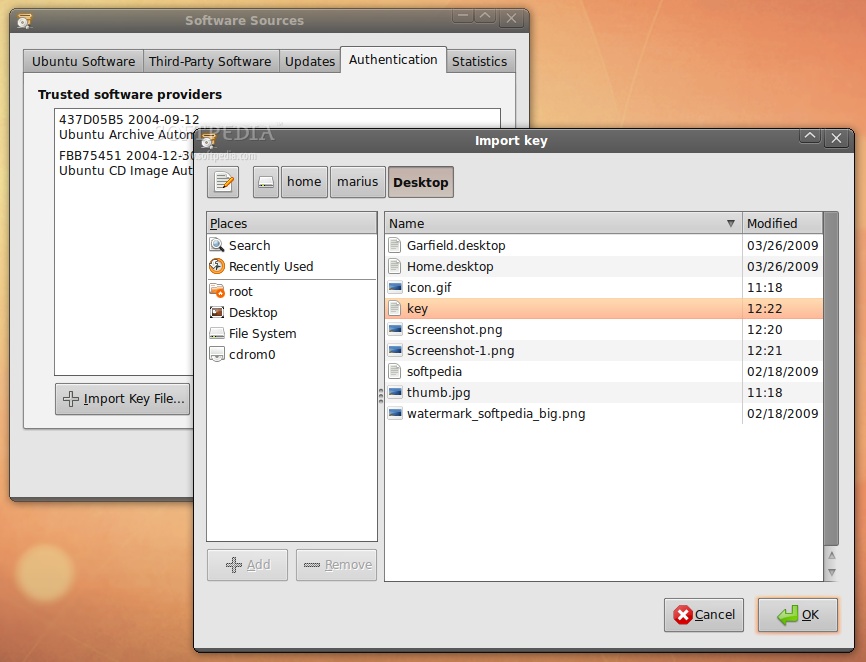
· Right click HERE and choose the "Save Link As..." option to save the key file on your desktop.

· Go to the fourth tab, "Authentication," click the "Import Key File" button, navigate to the location where you've just saved the key file (usually, it is File System/home/YOURUSERNAME/Desktop) and double click it. You will immediately see a new entry called "247D1CFF 2009-01-21 Launchpad PPA for OpenOffice.org Scribblers."

Review image


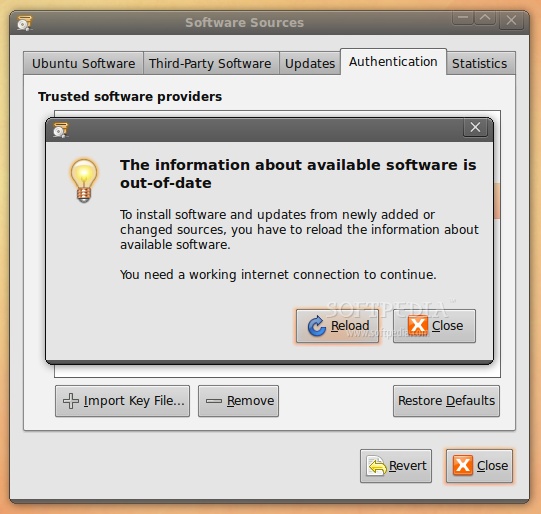
Now, click the “Close” button, then the “Reload” one and wait for the application to close!

Review image


STEP 2 - Install OpenOffice.org 3.1

At this moment, you don't have any OpenOffice.org suite installed in your system. Therefore, go to Applications -> Add/Remove...

Review image


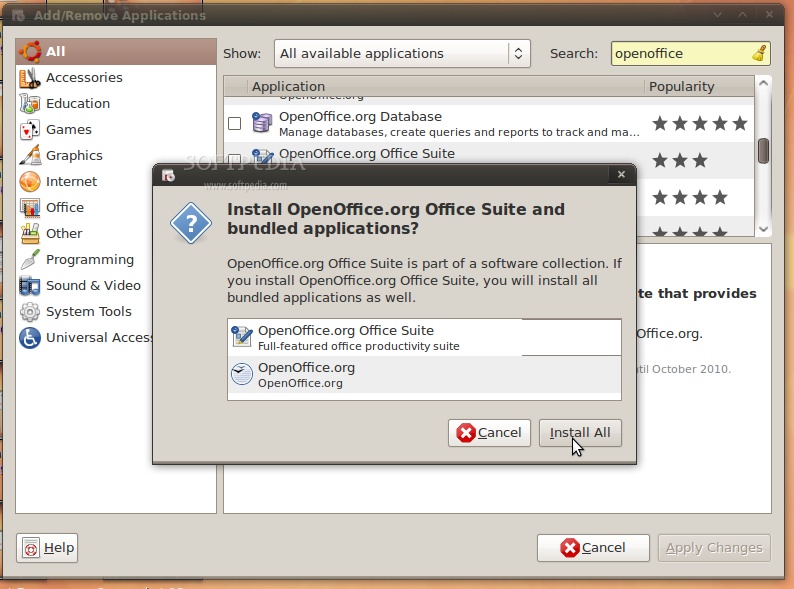
Select the "All availalbe applications" option from the "Show" drop-down menu and search for openoffice in the "Search" box. The OpenOffice.org Suite will be found... scroll down until you see it and click on the check box in front of it. Click the "Install All" button when asked if you want to install the OpenOffice.org Suite and bundled applications...

Review image


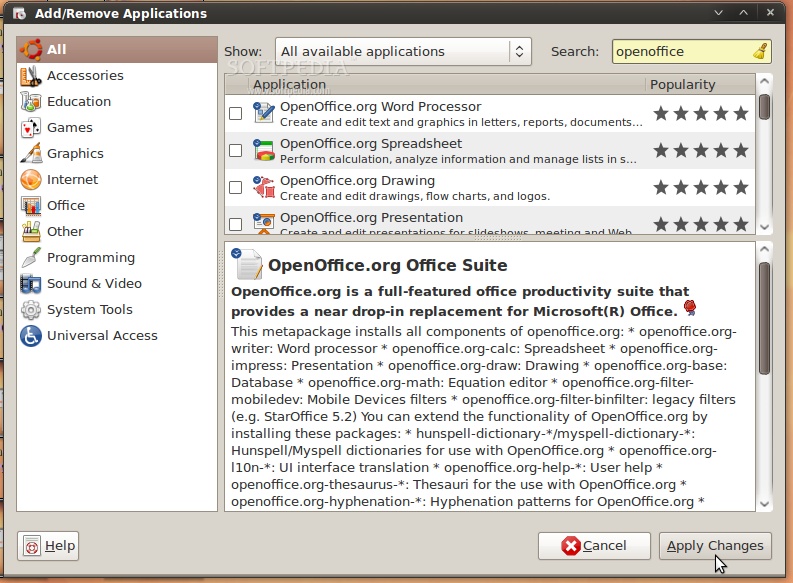
Now, click the "Apply Changes" button...

Review image


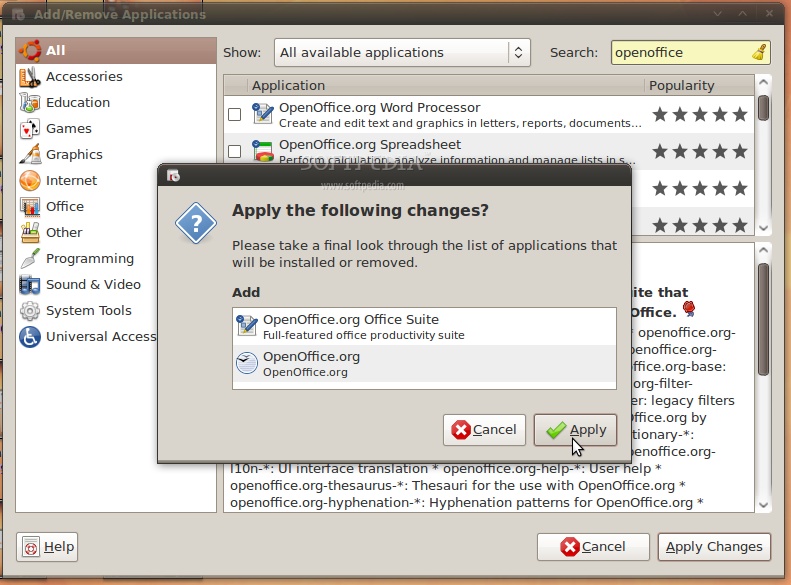
Then the "Apply" button...

Review image


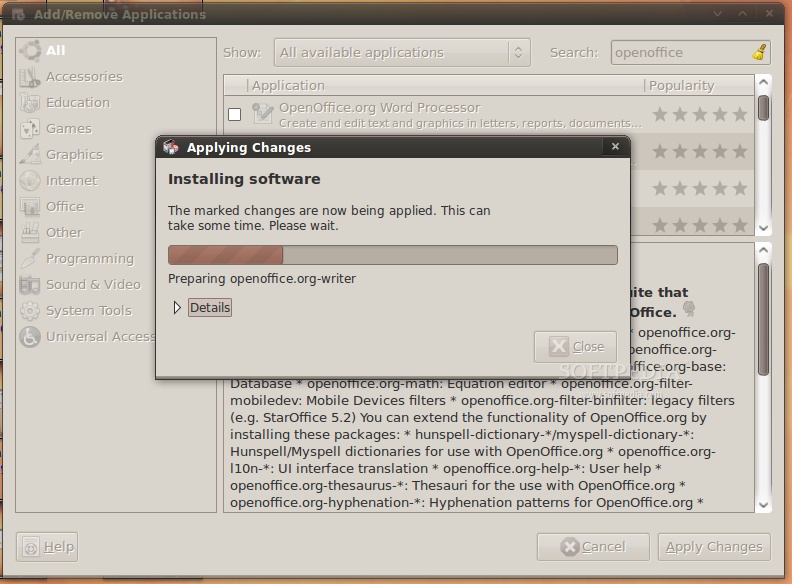
Wait for the installer to install the new OpenOffice.org packages....

Review image


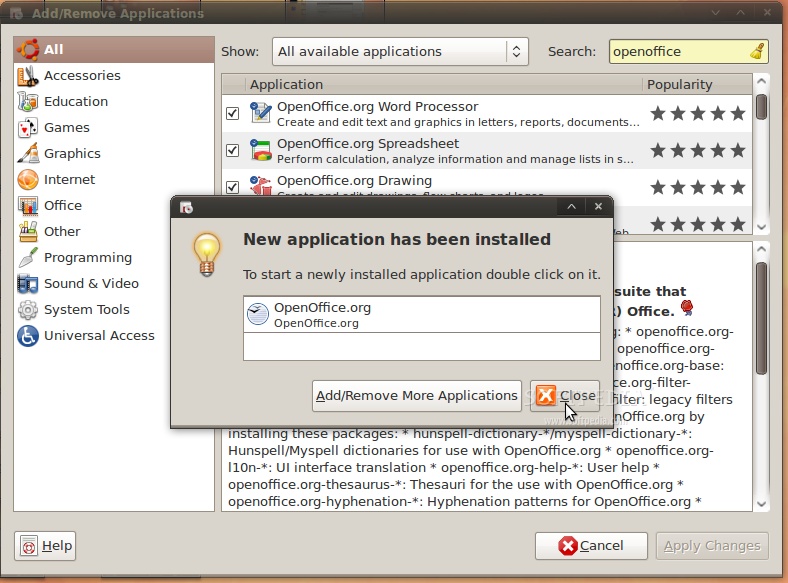
When the installation process is over, you will be notified. Click the "Close" button to close the Add/Remove software...

Review image


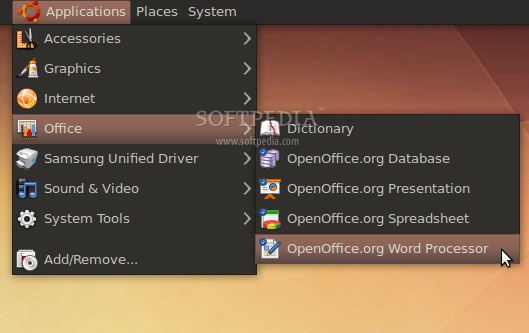
That's all, folks! Go to Applications -> Office and you can use your brand new OpenOffice.org 3.1 office suite.

Review image


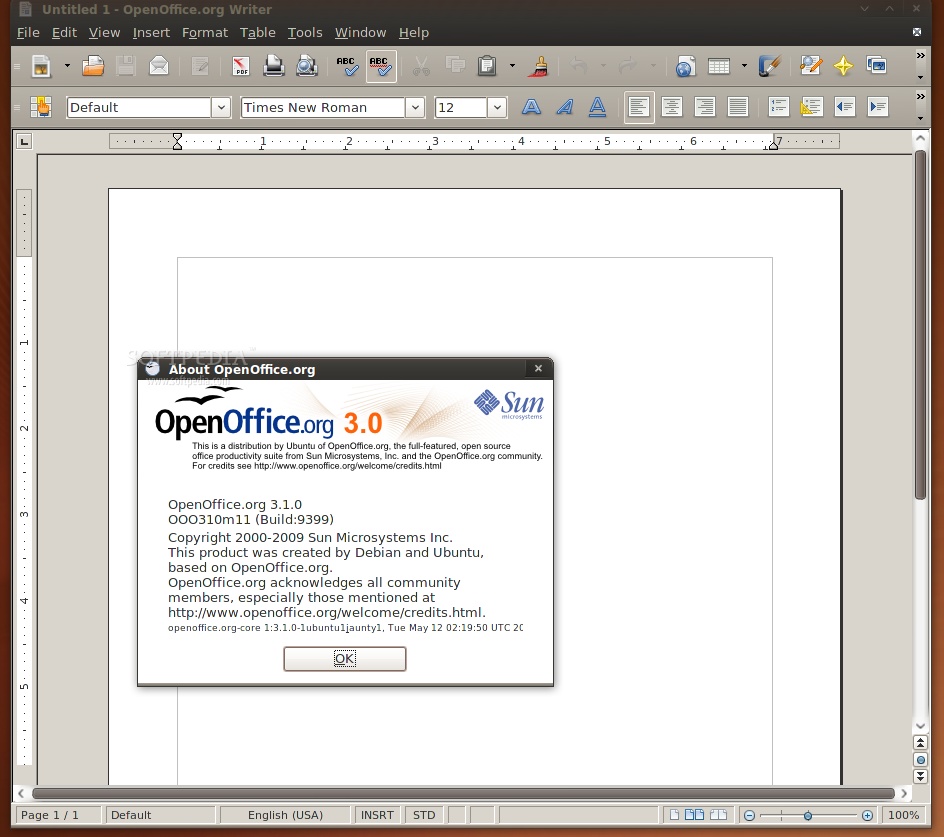
And the best part is that your open source office suite will be up-to-date from now on. Take a look below at some shots of OpenOffice.org 3.1 in Ubuntu 9.04 (Jaunty Jackalope).

Review image


Review image


Credits: Special thanks go to Chris Cheney and the "OpenOffice.org Scribblers" team for creating the PPA for Ubuntu.

Tuesday, September 22, 2009

Enable Gujarati Phonetic in Openoffice Ubuntu 8.10

As we know both Ubuntu and Openoffice have a good support for different Indian Languages like Gujarati, Hindi, Tamil, etc.

But it has always been a question on how to enable the phonetic support with SCIM (smart common input method)

Below are the steps for enabling the support for phonetic / inscript keyboard support in openoffice 2.4 on ubuntu 8.10

Step 1 : Install the language support
go to System --> Administrator --> Language Support
(from the list select gujarati or any language you want support for)
click on the apply button below (This will install the required packages)

Step 2 : Starting Input method services for Gujarati, etc languages
go to System --> Preferences --> SCIM Input method setup
select Global Setup under IMEngine in the left pane
in the right pane select the required language
(You can disable unwanted languages)

Step 3 : Enabling scim for all text editors and openoffice documents
Edit /etc/profile and paste the following code at the end of file

# SCIM
export XMODIFIERS='@im=SCIM'
export GTK_IM_MODULE="scim"
export XIM_PROGRAM="scim -d"
export QT_IM_MODULE="scim"
scim -d

Restart the system

Step 4 : Start typing in Gujarati, etc language
Start Openoffice writer
find a small keyboard icon in notification area (generally top pannel)
click with left button on it and select the appropriate language

Start typing in the page area and enjoy....

Wednesday, September 2, 2009

Gujarat Board - Introduction to Computers

Dear Computer Teachers,
As we know there are two lessons based on scripting in Standard 12th Gujarat board. below you can find links for solved lab exercises for your reference to effectively guide your students for same.

how to download :
Select the below link copy and paste it in to addressbar of your web browser open the page to download the respective script

Linux & Open Source - Standard XII - Solutions for Lab Exercise Chapter 13 & 14
Lesson No. 13 [Problem - 1]
http://rapidshare.com/files/274582939/script1.sh.html
Lesson No. 13 [Problem - 2]

Wednesday, August 12, 2009

carry your bookmarks to other PCs - for firefox users

We generally save our bookmarks on our PC and then don't get it on other PCs

but now with startaid in firefox we can get our bookmarks on any PC we are browsing from - but only in firefox not any other browser

How to get started :

Adding Startaid to your browser
step 1 : go to tools --> Add-ons
Step 2 : click on get addons
step 3 : type startaid in search box on left top corner
step 4 : after finding the startaid addon in the list click on add to firefox button
Step 5 : click on install now button on next window
Step 6 : to see if Startaid is added to your list of addons click on extension in above toolbar
Step 7 : Close the addons box and restart your firefox
Step 8 : at restart you get a small login window asking for logging in on startaid server
step 9 : since you don't have the user created click on create new user
step 10 : create a user by providing the required information in the form and click on signup
step 11 : on the next page scroll down to the end to see go to your account > link
Note : you can visit the same site and to see all your bookmarks
step 12 : click on the Online Bookmarks item on the menu bar
step 13 : use the same menu item for future bookmarks in future
enjoy

Tuesday, August 4, 2009

How to write CDs in Linux (Ubuntu 8.10)

CD writing is made very easy in Ubuntu Linux the simplest and most common way for backing your data on CD is as follows

Open Places | CD/DVD Creator

Now see that in the newly opened window burn:/// is available in location bar

and you can see a big content area as the right pane of the file browser window

Open another file browser window to find files you want to backup or write on CD

Select those files and folders and drag them to the CD/DVD Creator window

find "write to disk" button on the right top corner above the content window and click it to find the Write to Disc dialog box

select the device you want to write on and click on write button to start writting the CD

Monday, August 3, 2009

How to write C, C++ Programs in Linux

Open any text editor

start typing your program

Save it on any path

go to the path and use gcc command
Note : gcc is the compiler used for compiling c, c++ programs in linux

on the command prompt type as following
gcc filename

the output by default is a.out which is created on the same place

if you want to change the out put file your desired name type following

gcc name_of_output_file name_of_input file
Note : there are spaces used in between gcc and output file name and input file name respectively

after compiling the file as output file you can directly execute the file as follows

./name_of_output_file
Note: remember .(dot) and /(forward slash) are used to run any executable file in Linux so they are essential

How to add Cliparts to your Open Office Applications

Download the Clipart Set from following location

http://openclipart.org/downloads/0.19/openclipart-0.19.zip

if zip unarchive utility is not available download below linked set

http://openclipart.org/downloads/0.19/openclipart-0.19.tar.gz

After Downloading unarchive the downloaded archive file in your desired folder

Open your open office application go to - tools | Gallery

Select New theme

on General Tab Page give a name for your new gallery

click on Files tab page

Click on find files

go to the path where clipart archive was extracted

Note : select complete folder on the path as file names are greyed

Click on OK button below

now you can see a list of all the files available on the selected path

Select the check box for preview of files on the right side in case you want only selected files

make selections for the files you want to be added and click on Add
Note : you can use shift and ctrl keys as we do for normal multi selection of objects

OR

Click on Add All to select all files for your new gallery

Click on OK button to see the new gallery added to the list available below the New Theme button in the Gallery

Note : You can select Tools | Gallery again to close the gallery
Note : Gallery button is also available on standard tool bar just find it to make your work more easy for putting the gallery on and off

Enjoy

Solution - Vmware error Unable to change virtual machine power state

In Ubuntu 8.10 While using Vmware Server 1.0.x I encountered an error as below

Unable to change virtual machine power state

I tried using config.pl file to rectify the problem and it used to get rectified every time but every time I shutdown the system and start again I used to get the error as stated above

Solution to the above error is to create the symlink for two library files. Probably vmware server is not able to find the path for it. make symlinks as follows

sudo cp /lib/libgcc_s.so.1 /usr/lib/vmware/lib/libgcc_s.so.1
and the other files is

sudo cp /usr/lib/libpng12.so.0 /usr/lib/vmware/lib/libpng12.so.0

after creating the symlinks restart vmware with

/etc/init.d/vmware restart

enjoy using the hassle free vmware and pass your comments if this doesn't work in any scenarios

Wednesday, July 29, 2009

How to create More than 50 Google Apps Users for your School or any Educational Institute

Schools and othe educational institutions can greatly benefit out of Google apps by providing collaboration tools to their students and teachers with free email and collaboration access

Benefits :
1. Creating username@yourschool.com for every student and teacher
2. Using Google Docs for sharing information between teachers & Students or group of students.
3. Assigning Group Projects to students by Teachers

See a quick how-to below to create your own user accounts for your own website on google apps


First Step : Moving on to the google apps web site

type : http://www.google.com/apps/ in browser address bar

Select : School IT Managers

Select : Free Google Message Security

Select : Type of Institute (K-12 for Primary & Secondary School or College / University for College)

Select : Sign Up Now

Type : Your Domain Name (eg. schoolname.com,.edu,.in,etc)

Select : Continue Sign Up

Fill up : the Sign Up form with relevant information on number of students etc.

Note : Select tick mark for "I understand that if I cannot alter DNS records for my domain, I may impact my organization's ability to use Google Apps"

Note : for signing up properly you need to change MX Record and CNAME of your website. You can make changes to your website from its control panel. It is only possible if you have administrator username and password

(You may follow steps as given here on below link to change MX Record)
http://www.google.com/support/a/bin/answer.py?hl=en&answer=33352

(You may follow steps as given here on below link to change CNAME)

http://www.google.com/support/a/bin/answer.py?hl=en&answer=53340

Note : After making necessary changes to your website fill in the form with necessary information

Select : Continue

Creating your administrator account

type : username (of your choice)
type : password (of your choice)
Re-enter : the password

Select : I accept. continue with setup

Finally find the Main Google Apps Dashboard for your use

It will be active within 24-48 hours

you can create new users for google apps