Wednesday, December 16, 2009

Google Gujarati Support

Storing transliteration bookmarklet on Firefox

Note: Transliteration bookmarklet is supported on Firefox version 3 and above. If you come across font issues, see this Wikipedia article for possible solutions.

Perform the following steps:
  1. Right-click this link: [અ Type in Gujarati].

  2. Click on "Bookmark This Link".

    Adding bookmarklet to Firefox toolbar

  3. Choose "Bookmarks Toolbar" in the "Folder" option.

    Choosing Bookmarks toolbar in Firefox

  4. Click "Done".

After following the above steps, a bookmark with name [અ Type in Gujarati] should appear in the Firefox Bookmark toolbar as follows:

Firefox Bookmarks toolbar


If you do not see the the bookmark, follow this additional step:

Make sure that the Bookmarks toolbar is enabled. Right-click on the empty space next to "Help" menu and click on the "Bookmarks Toolbar" option:

Ensuring Bookmarks toolbar is visible in Firefox


Done! You can now go to Using the transliteration bookmarklet section for details on how to use the bookmarklet.

Friday, November 13, 2009

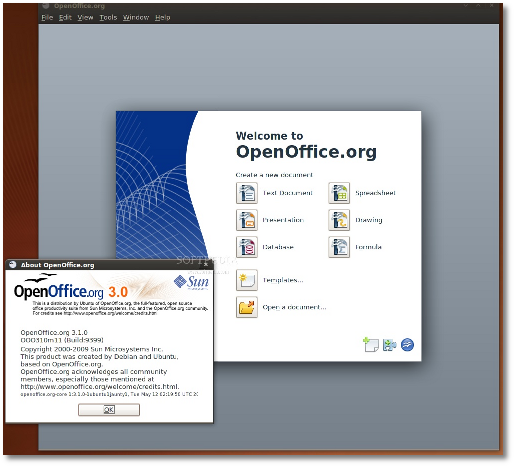
Install Openoffice 3.1 in Ubuntu 8.10

Hi friends,
lets straightaway get started with the steps involved in installing the newly arrived openoffice 3.1 in Ubuntu 8.04 / 8.10 / 9.04 / 9.10

First Step : is to remove the existing openoffice if you have it.

Remove your existing OpenOffice installation by using the following two commands:

sudo apt-get remove --purge openoffice.org
sudo apt-get autoremove --purge


Add the OpenOffice.org 3.1 repositories

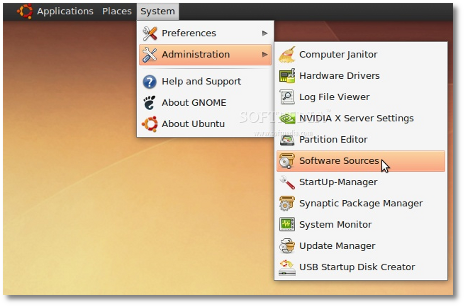
Go to System -> Administration -> Software Sources...

Review image


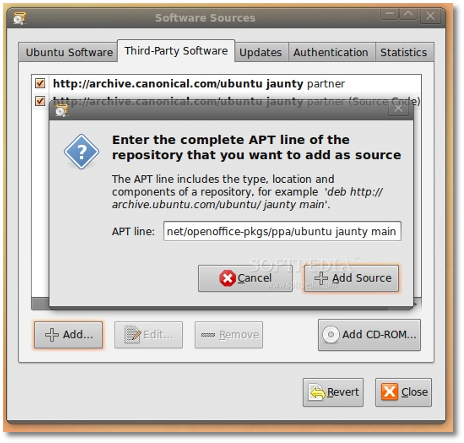
Enter your password. Go to the second tab, "Third-Party Software," click on the "Add" button, and paste the line below for your Ubuntu distribution...

For Ubuntu 8.04

deb http://ppa.launchpad.net/openoffice-pkgs/ppa/ubuntu hardy main

For Ubuntu 8.10

deb http://ppa.launchpad.net/openoffice-pkgs/ppa/ubuntu intrepid main

For Ubuntu 9.04

deb http://ppa.launchpad.net/openoffice-pkgs/ppa/ubuntu jaunty main

For Ubuntu 9.10

deb http://ppa.launchpad.net/openoffice-pkgs/ppa/ubuntu karmic koala main

Review image


· Right click HERE and choose the "Save Link As..." option to save the key file on your desktop.

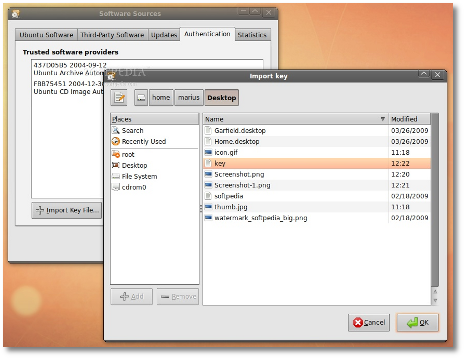
· Go to the fourth tab, "Authentication," click the "Import Key File" button, navigate to the location where you've just saved the key file (usually, it is File System/home/YOURUSERNAME/Desktop) and double click it. You will immediately see a new entry called "247D1CFF 2009-01-21 Launchpad PPA for OpenOffice.org Scribblers."

Review image


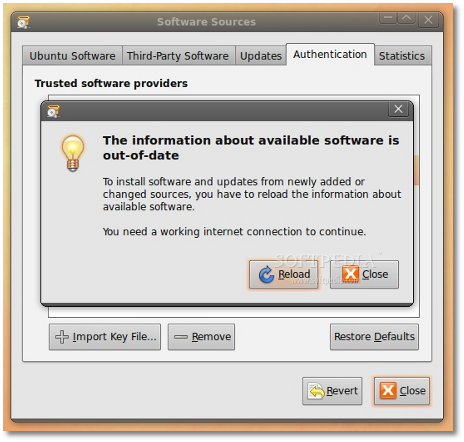
Now, click the “Close” button, then the “Reload” one and wait for the application to close!

Review image


STEP 2 - Install OpenOffice.org 3.1

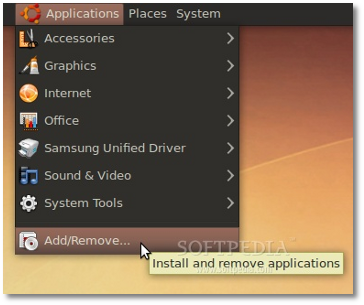
At this moment, you don't have any OpenOffice.org suite installed in your system. Therefore, go to Applications -> Add/Remove...

Review image


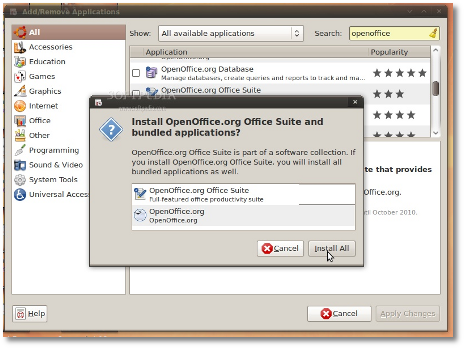
Select the "All availalbe applications" option from the "Show" drop-down menu and search for openoffice in the "Search" box. The OpenOffice.org Suite will be found... scroll down until you see it and click on the check box in front of it. Click the "Install All" button when asked if you want to install the OpenOffice.org Suite and bundled applications...

Review image


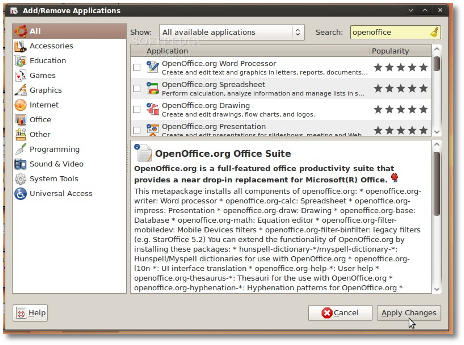
Now, click the "Apply Changes" button...

Review image


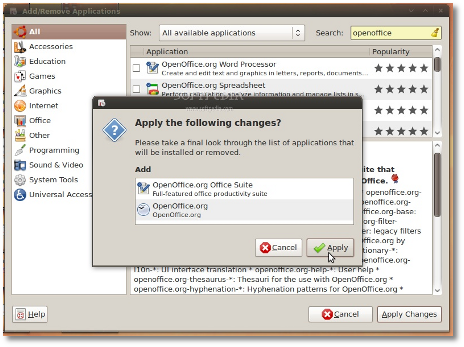
Then the "Apply" button...

Review image


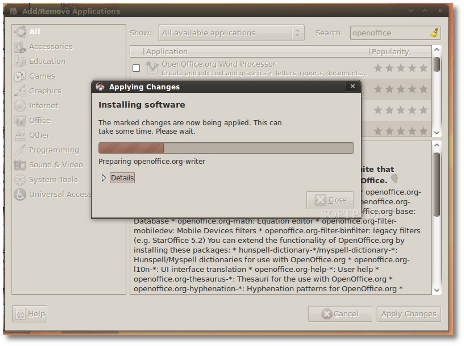
Wait for the installer to install the new OpenOffice.org packages....

Review image


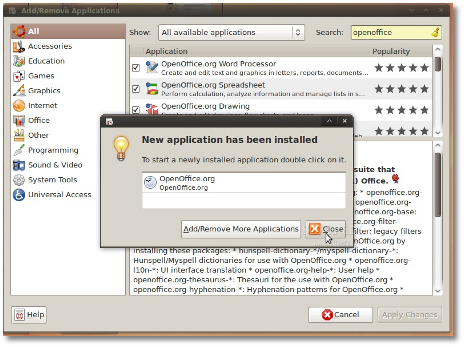
When the installation process is over, you will be notified. Click the "Close" button to close the Add/Remove software...

Review image


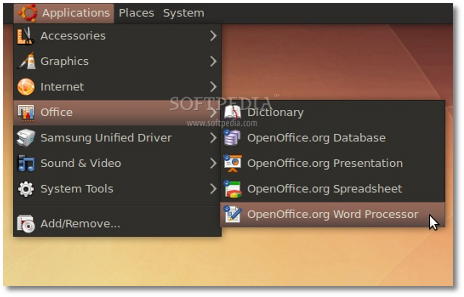
That's all, folks! Go to Applications -> Office and you can use your brand new OpenOffice.org 3.1 office suite.

Review image


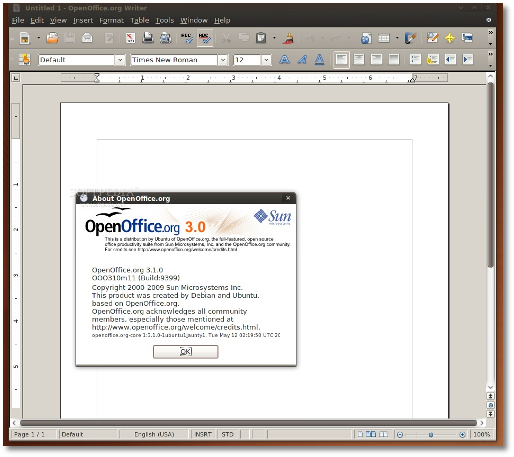
And the best part is that your open source office suite will be up-to-date from now on. Take a look below at some shots of OpenOffice.org 3.1 in Ubuntu 9.04 (Jaunty Jackalope).

Review image


Review image


Credits: Special thanks go to Chris Cheney and the "OpenOffice.org Scribblers" team for creating the PPA for Ubuntu.

Tuesday, September 22, 2009

Enable Gujarati Phonetic in Openoffice Ubuntu 8.10

As we know both Ubuntu and Openoffice have a good support for different Indian Languages like Gujarati, Hindi, Tamil, etc.

But it has always been a question on how to enable the phonetic support with SCIM (smart common input method)

Below are the steps for enabling the support for phonetic / inscript keyboard support in openoffice 2.4 on ubuntu 8.10

Step 1 : Install the language support
go to System --> Administrator --> Language Support
(from the list select gujarati or any language you want support for)
click on the apply button below (This will install the required packages)

Step 2 : Starting Input method services for Gujarati, etc languages
go to System --> Preferences --> SCIM Input method setup
select Global Setup under IMEngine in the left pane
in the right pane select the required language
(You can disable unwanted languages)

Step 3 : Enabling scim for all text editors and openoffice documents
Edit /etc/profile and paste the following code at the end of file

# SCIM
export XMODIFIERS='@im=SCIM'
export GTK_IM_MODULE="scim"
export XIM_PROGRAM="scim -d"
export QT_IM_MODULE="scim"
scim -d

Restart the system

Step 4 : Start typing in Gujarati, etc language
Start Openoffice writer
find a small keyboard icon in notification area (generally top pannel)
click with left button on it and select the appropriate language

Start typing in the page area and enjoy....

Wednesday, September 2, 2009

Gujarat Board - Introduction to Computers

Dear Computer Teachers,
As we know there are two lessons based on scripting in Standard 12th Gujarat board. below you can find links for solved lab exercises for your reference to effectively guide your students for same.

how to download :
Select the below link copy and paste it in to addressbar of your web browser open the page to download the respective script

Linux & Open Source - Standard XII - Solutions for Lab Exercise Chapter 13 & 14
Lesson No. 13 [Problem - 1]
http://rapidshare.com/files/274582939/script1.sh.html
Lesson No. 13 [Problem - 2]

Wednesday, August 12, 2009

carry your bookmarks to other PCs - for firefox users

We generally save our bookmarks on our PC and then don't get it on other PCs

but now with startaid in firefox we can get our bookmarks on any PC we are browsing from - but only in firefox not any other browser

How to get started :

Adding Startaid to your browser
step 1 : go to tools --> Add-ons
Step 2 : click on get addons
step 3 : type startaid in search box on left top corner
step 4 : after finding the startaid addon in the list click on add to firefox button
Step 5 : click on install now button on next window
Step 6 : to see if Startaid is added to your list of addons click on extension in above toolbar
Step 7 : Close the addons box and restart your firefox
Step 8 : at restart you get a small login window asking for logging in on startaid server
step 9 : since you don't have the user created click on create new user
step 10 : create a user by providing the required information in the form and click on signup
step 11 : on the next page scroll down to the end to see go to your account > link
Note : you can visit the same site and to see all your bookmarks
step 12 : click on the Online Bookmarks item on the menu bar
step 13 : use the same menu item for future bookmarks in future
enjoy

Tuesday, August 4, 2009

How to write CDs in Linux (Ubuntu 8.10)

CD writing is made very easy in Ubuntu Linux the simplest and most common way for backing your data on CD is as follows

Open Places | CD/DVD Creator

Now see that in the newly opened window burn:/// is available in location bar

and you can see a big content area as the right pane of the file browser window

Open another file browser window to find files you want to backup or write on CD

Select those files and folders and drag them to the CD/DVD Creator window

find "write to disk" button on the right top corner above the content window and click it to find the Write to Disc dialog box

select the device you want to write on and click on write button to start writting the CD

Monday, August 3, 2009

How to write C, C++ Programs in Linux

Open any text editor

start typing your program

Save it on any path

go to the path and use gcc command
Note : gcc is the compiler used for compiling c, c++ programs in linux

on the command prompt type as following
gcc filename

the output by default is a.out which is created on the same place

if you want to change the out put file your desired name type following

gcc name_of_output_file name_of_input file
Note : there are spaces used in between gcc and output file name and input file name respectively

after compiling the file as output file you can directly execute the file as follows

./name_of_output_file
Note: remember .(dot) and /(forward slash) are used to run any executable file in Linux so they are essential

How to add Cliparts to your Open Office Applications

Download the Clipart Set from following location

http://openclipart.org/downloads/0.19/openclipart-0.19.zip

if zip unarchive utility is not available download below linked set

http://openclipart.org/downloads/0.19/openclipart-0.19.tar.gz

After Downloading unarchive the downloaded archive file in your desired folder

Open your open office application go to - tools | Gallery

Select New theme

on General Tab Page give a name for your new gallery

click on Files tab page

Click on find files

go to the path where clipart archive was extracted

Note : select complete folder on the path as file names are greyed

Click on OK button below

now you can see a list of all the files available on the selected path

Select the check box for preview of files on the right side in case you want only selected files

make selections for the files you want to be added and click on Add
Note : you can use shift and ctrl keys as we do for normal multi selection of objects

OR

Click on Add All to select all files for your new gallery

Click on OK button to see the new gallery added to the list available below the New Theme button in the Gallery

Note : You can select Tools | Gallery again to close the gallery
Note : Gallery button is also available on standard tool bar just find it to make your work more easy for putting the gallery on and off

Enjoy

Solution - Vmware error Unable to change virtual machine power state

In Ubuntu 8.10 While using Vmware Server 1.0.x I encountered an error as below

Unable to change virtual machine power state

I tried using config.pl file to rectify the problem and it used to get rectified every time but every time I shutdown the system and start again I used to get the error as stated above

Solution to the above error is to create the symlink for two library files. Probably vmware server is not able to find the path for it. make symlinks as follows

sudo cp /lib/libgcc_s.so.1 /usr/lib/vmware/lib/libgcc_s.so.1
and the other files is

sudo cp /usr/lib/libpng12.so.0 /usr/lib/vmware/lib/libpng12.so.0

after creating the symlinks restart vmware with

/etc/init.d/vmware restart

enjoy using the hassle free vmware and pass your comments if this doesn't work in any scenarios

Wednesday, July 29, 2009

How to create More than 50 Google Apps Users for your School or any Educational Institute

Schools and othe educational institutions can greatly benefit out of Google apps by providing collaboration tools to their students and teachers with free email and collaboration access

Benefits :
1. Creating username@yourschool.com for every student and teacher
2. Using Google Docs for sharing information between teachers & Students or group of students.
3. Assigning Group Projects to students by Teachers

See a quick how-to below to create your own user accounts for your own website on google apps


First Step : Moving on to the google apps web site

type : http://www.google.com/apps/ in browser address bar

Select : School IT Managers

Select : Free Google Message Security

Select : Type of Institute (K-12 for Primary & Secondary School or College / University for College)

Select : Sign Up Now

Type : Your Domain Name (eg. schoolname.com,.edu,.in,etc)

Select : Continue Sign Up

Fill up : the Sign Up form with relevant information on number of students etc.

Note : Select tick mark for "I understand that if I cannot alter DNS records for my domain, I may impact my organization's ability to use Google Apps"

Note : for signing up properly you need to change MX Record and CNAME of your website. You can make changes to your website from its control panel. It is only possible if you have administrator username and password

(You may follow steps as given here on below link to change MX Record)
http://www.google.com/support/a/bin/answer.py?hl=en&answer=33352

(You may follow steps as given here on below link to change CNAME)

http://www.google.com/support/a/bin/answer.py?hl=en&answer=53340

Note : After making necessary changes to your website fill in the form with necessary information

Select : Continue

Creating your administrator account

type : username (of your choice)
type : password (of your choice)
Re-enter : the password

Select : I accept. continue with setup

Finally find the Main Google Apps Dashboard for your use

It will be active within 24-48 hours

you can create new users for google apps

Monday, July 20, 2009

Download Enjay ThinClient Setup for RHEL4

Gujarat Board School - RHEL 4 in syllabus

This is an Easy way to use both Windows and Linux simultaneously without restarting your pcs

Download Enjay ThinClient Setup for RHEL4
http://rapidshare.com/files/253332780/RHEL4.tar.bz2.html

This setup is only for people using enjay thinclient cards thin clients

Script for Creating Easy Samba Share

RHEL4 Gujarat Board Schools Standard XII - std 12

download the archive from :
find sharecrt file
double click on file with mouse
select "run in terminal"

Map drive in windows PC
go to file browser
select map network drives
and give the path as follows : \\data\data

there is option for another drive :

go to file browser
select map network drives
and give the path as follows : \\data\data1

mounting NTFS in RHEL4


RHEL4 in Gujarat Board School Std XII (standard 12)

:::: Loading NTFS drives in RHEL4 ::::
--------------------------------------------------------
1. Copy kernel-module-ntfs-2.6.9-5.ELsmp-2.1.
20-0.rr.4.10.i686.rpm to /root/Desktop
(or any where in this case)

2. Open Terminal Window (right click desktop
- first option)

3. type following command (# is prompt so do
not type #)
# rpm -ivh /root/Desktop/kernel-module-ntfs
-2.6.9-5.ELsmp-2.1.20-0.rr.4.10.i686.rpm

# modprobe ntfs

Note : Now you can mount any NTFS partition connected
to your RHEL4 system
Note : NTFS partition do not have write facility

Write facility can be provided but it is a lengthy process
and not very useful in our case

:::: Mounting NTFS Partitions ::::
--------------------------------------------------------
Open Terminal window
use following command to find NTFS Partition on Hard
Drive
# fdisk -l

Disk /dev/hdb: 160.0 GB, 160041885696 bytes
255 heads, 63 sectors/track, 19457 cylinders
Units = cylinders of 16065 * 512 = 8225280 bytes

Device Boot Start End Blocks Id System
/dev/hdb1 * 1 3888 31230328+ 7 HPFS/NTFS
/dev/hdb2 3889 19457 125057992+ 5 Extended
/dev/hdb5 14977 14988 96358+ 83 Linux
/dev/hdb6 14989 16204 9767488+ 83 Linux
/dev/hdb7 16205 18028 14651248+ 83 Linux
/dev/hdb8 18029 19244 9767488+ 83 Linux
/dev/hdb9 19245 19457 1710891 82 Linux swap

Note : in above eg. /dev/hdb1 is NTFS Partition
(try and identify your NTFS partitions
accordingly)
Make a directory to mount this NTFS partition

# mkdir /mnt/win_c_drive

# mount /dev/hdb1 /mnt/win_c_drive

# cd /mnt/win_c_drive (use ls to see the file and folder
list)

# open your file browser and browse to /mnt/win_c_drive
to see in directory listing in GUI

:::: Un-mount partition ::::
--------------------------------------------------------
# cd /

# umount /mnt/win_c_drive

Sunday, March 29, 2009

Easy Way To Save Flash/YouTube Videos on Linux

Easy Way To Save Flash/YouTube Videos on Linux

Did you know that you can easily download flash videos like on YouTube without having to install any browser plugin or desktop application? Yes you can, and you will only need your Linux box minus the terminal or some magic commands.

You can download Flash/YouTube Videos on Linux in 3 simple steps:

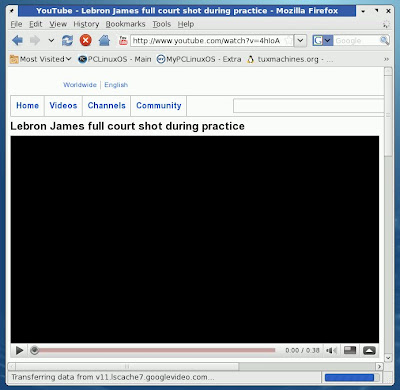
Step-1. Open your web browser and go to the web page with the video that you would like download. Wait until the video loads completely. --In you YouTube, you will know that it's fully loaded when the lighter red indicator bar (found at the bottom of the video player) reached the right end side.


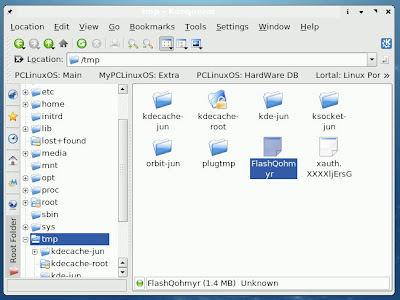
Step-2. Navigate to /tmp folder, and there you will see the flash video that you have just downloaded. The name of the downloaded video file has the word "Flash" on it.


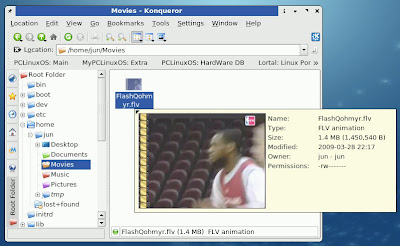
Step-3. Rename the video file with a .flv extension and save it to wherever you like.


You are done and as simple as that!

Tuesday, March 24, 2009

My visit to some parts of Maharashtra

It was really exotic weekend with religious flavor in Maharashtra. We started at 6 pm on friday, 20, march, 2009 to Anandi near chakan, pune. We had a stay there till next day. early morning on sunday we started for shivneri which is near junnar, arround 100 kms from pune. Shivneri is a fort which holds the pride of experiencing birth of the great Maratha Chatrapati Shri Shivaji. The atmoshphere and living in Shivneri doesn't talk much about the Great Shivaji but the place has the potential of holding the power of Indian History. Lets come back to junnar. Junnar from a tourist point of view can be the center of stay to visit different places in surroundings. two famous Ashtavinayak tirth sthan Lenyadri & Ojhar are situated in surrounding of 10 kms. Malshej ghat one of the rainy attraction of maharashtra is located in 20 kms radius of junnar. several other religious and picnic spots are located in 10-20 kms radius of junnar. After having a stay till next day and visiting lenyadri we started for bhimashankar which is 63 kms from junnar. the roads are not well maintained but an average speed of 30 kms/hr. can be maintained to reach bhimashankar in 2 and half hour with a 15-20 minutes break on the way. though bhimashankar was supposed to be the last spot to visit and reach bhilad (one of the small towns on border of gujarat and maharashtra) where I stay. we were running out of time to reach the same night. The road way selected for bhilad was via manchar, nashik, peth, pardi and finally to bhilad. but we would have been able to reach bhilad at arround 3 or 4 in morning. we prefered to have a stay so before reaching nashik we changed our way to shirdi. Shirdi was a real struggle to find a good place which took us arround 1 hour so we decided to have our dinner there. during our dinner we decided to leave shirdi and reach nashik for our night stay at muktidham. We reached muktidham at arround 11 pm we found good stay at muktidham temple. on next morning after having our prayer and darshan at muktidham temple which have almost all the god and goddesses of hindu religion and ofcourse all 12 jyotirlings we started for our journey back to bhilad. We were planning to have a good breakfast in nashik market where we halted for famous Kondaji chivda but didn't really find a good place for having our breakfast. It was as always that we thought we will have some better place on our way. We were finally on peth dharampur road which unfortunately doesn't have any good place to have breakfast. We further moved to find good Grape yards where we had a halt of arround 15 minutes to purchase 5 kgs of grapes. moving on further we found a farm of brinjal and cauli flower. where we had an experience of plucking those vegetables directly from respective plantations and enjoy. we next moved forward and finally found a dhaba called honey which was a veg restaurant. every thing there was good except the management but somehow we managed to finish our lunch there and move towards bhilad. finally at 2.45 pm on tuesday, 24, march, 2009 we reached bhilad. it was a good really a good exotic weekend with religious flavor in maharashtra.